Set up and run CloudSign
Cloud Sign setup and deployment
Overview
Programmatic MPC using Cloud Sign requires the following workflow:
- Setup 3 Cloud Sign devices in the Palisade console and securely store the pairing key for each device
- Run all Cloud Sign nodes, each with its respective pairing key
- Approve or have an administrator approve each Cloud Sign device
- Create an MPC quorum comprising the Cloud Sign devices
- Create an MPC key with the Cloud Sign quorum
We're setting up 3 Cloud Sign devices because a single MPC quorum requires a total of 3 signers (with 2 required to sign transactions).
Cloud Sign device setup in Palisade console
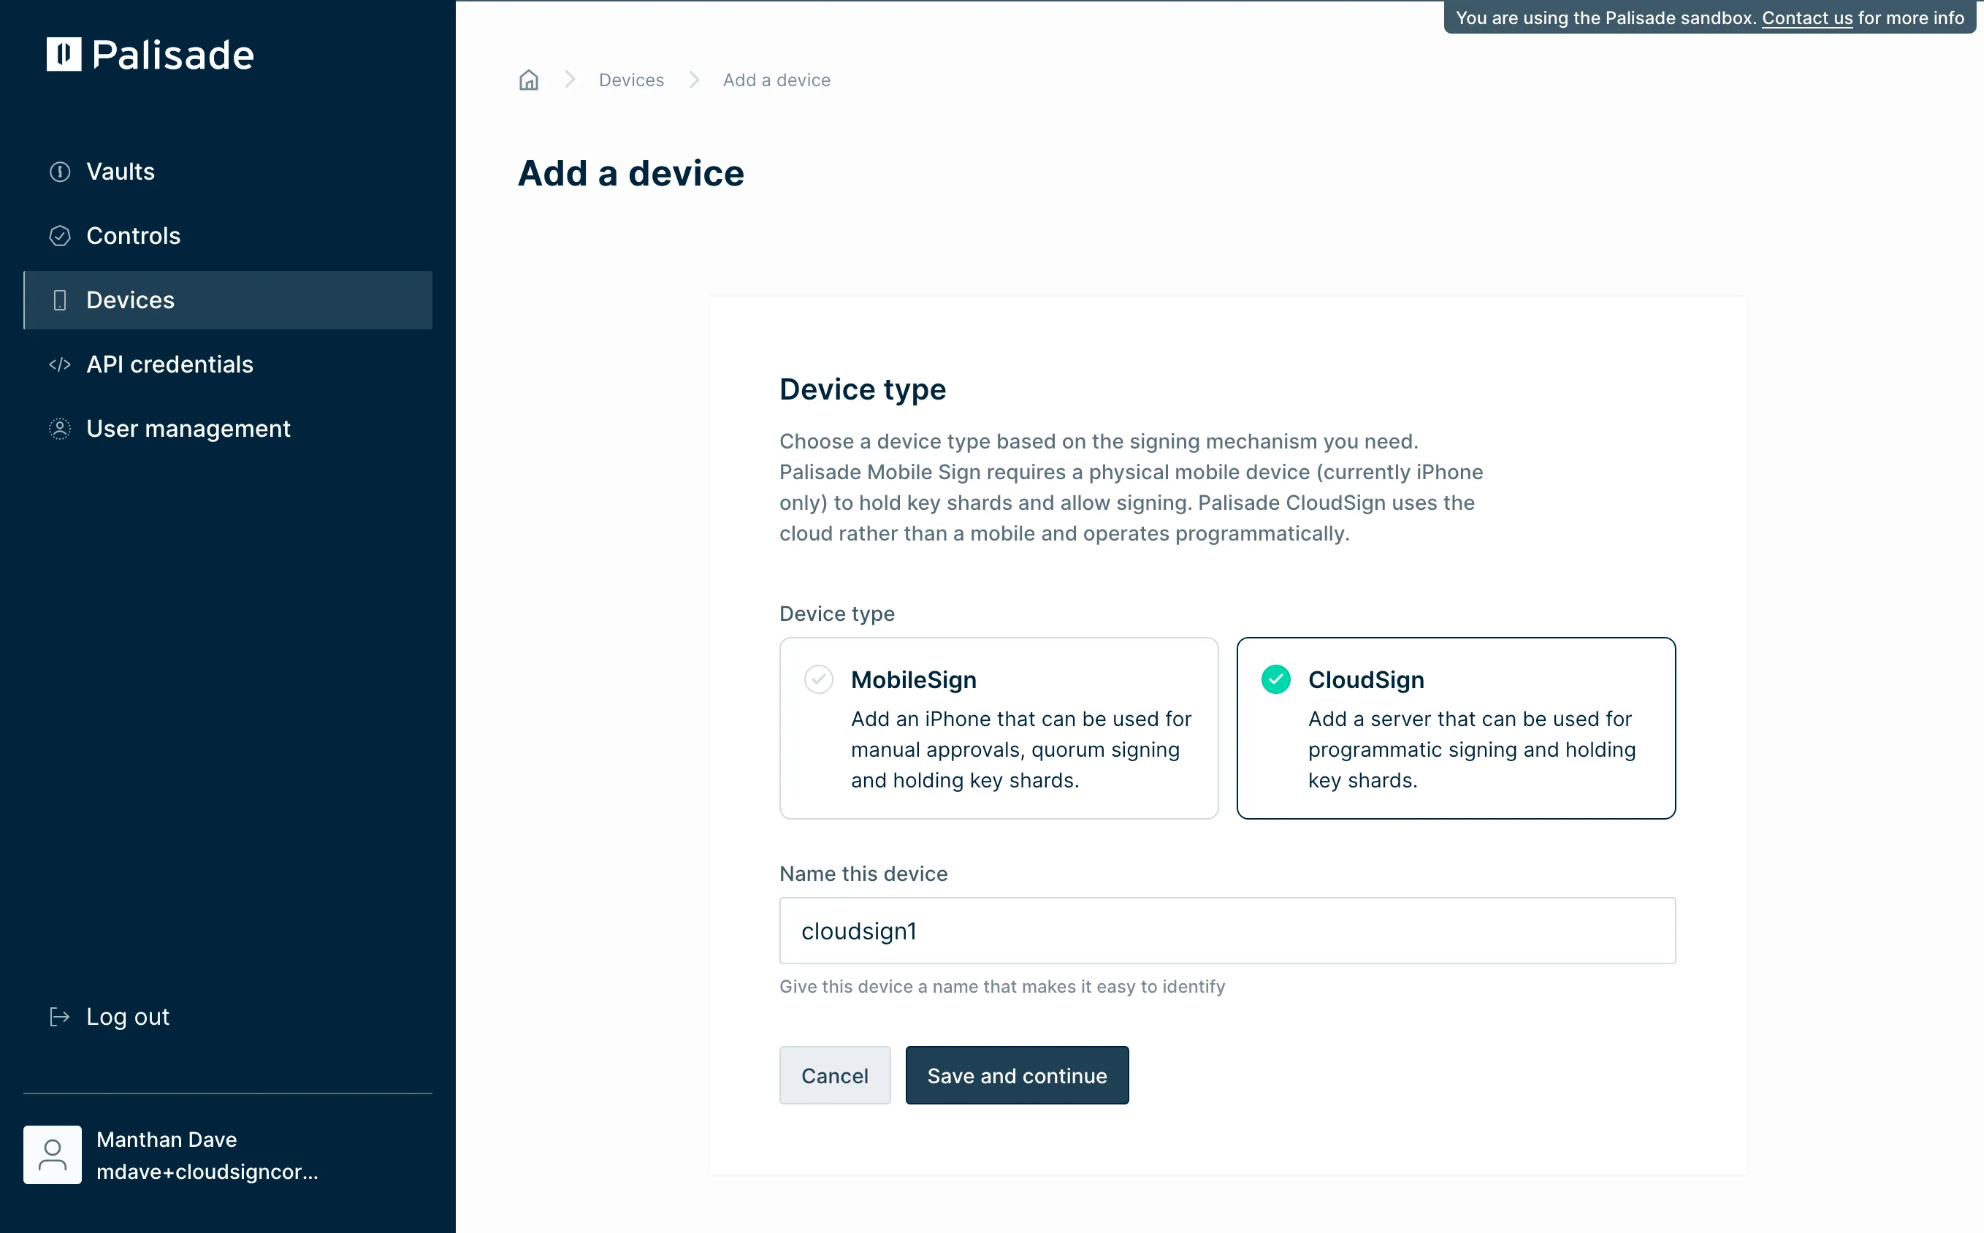
Login to the Palisade console as administrator or a standard user. Navigate to devices page.
- Click Add a device.
- Choose CloudSign as device type.
- Give the device a meaningful name.
- Click Save and continue
You should see the following screen.
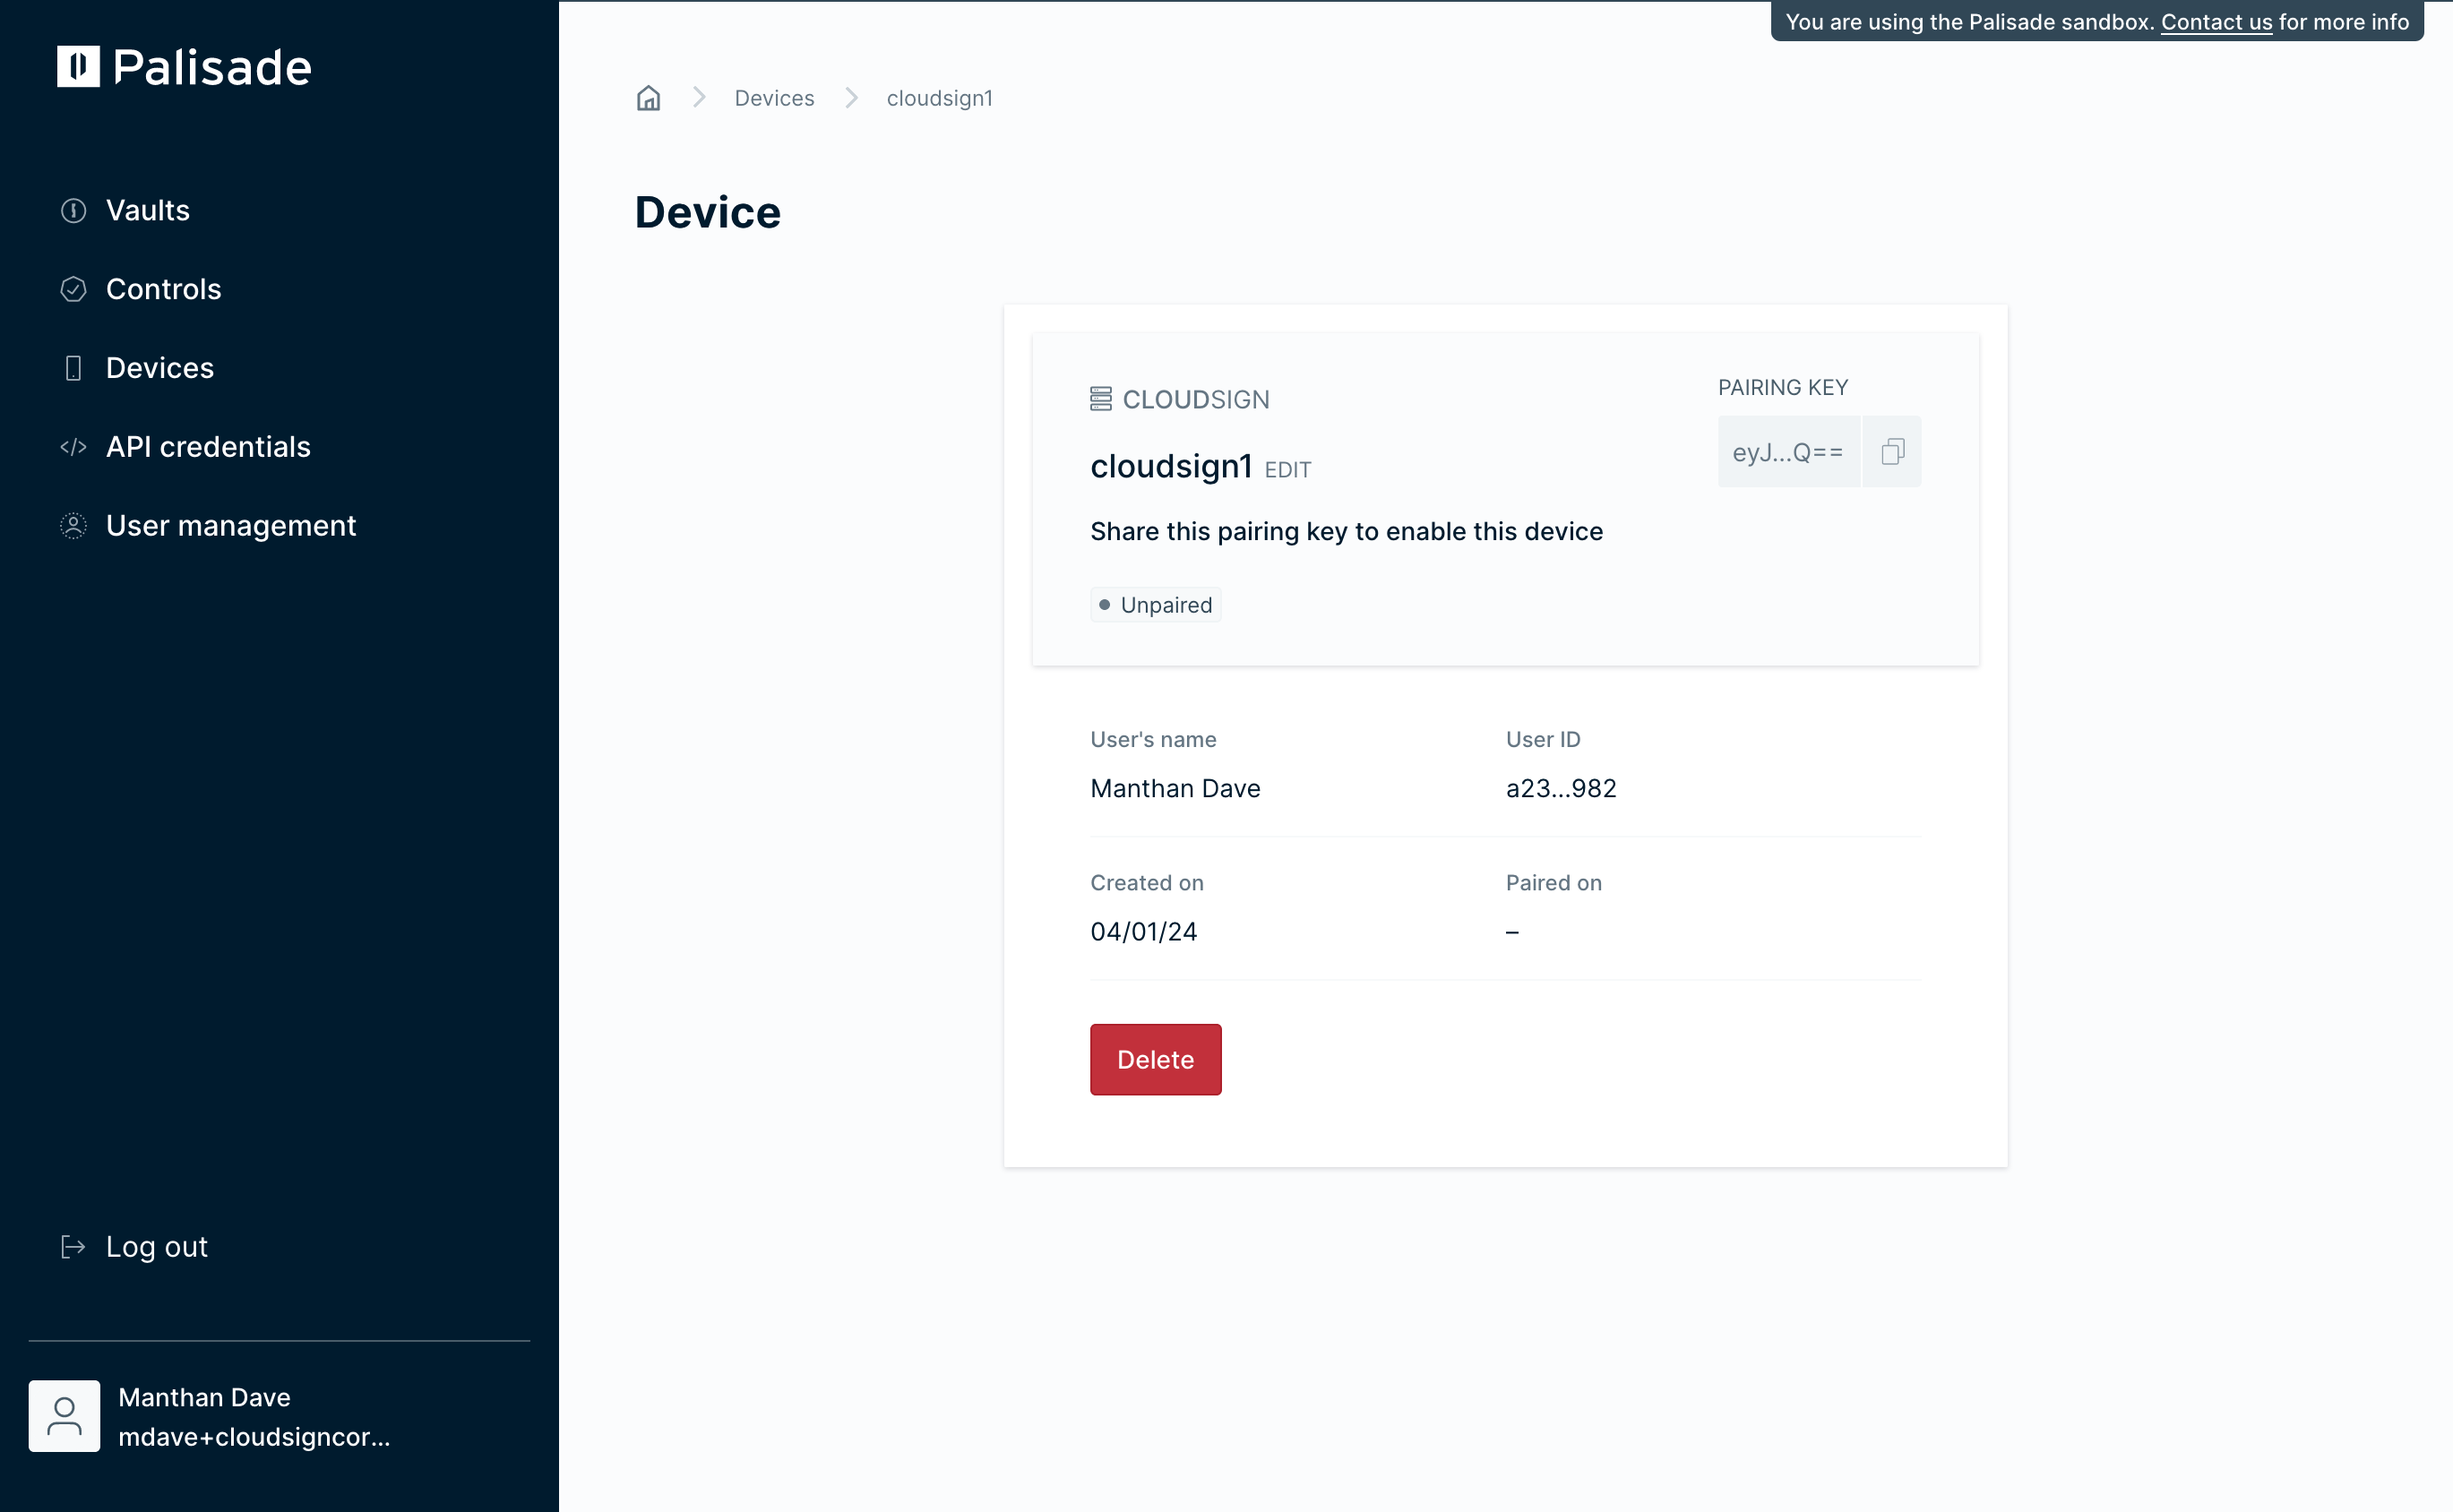
You have created a Cloud Sign device in the Palisade console with the specified name. By default, the device is in an 'Unpaired' state, indicating that it has not been initialised and is not available for use.
The Cloud Sign node that you will run in the next step requires the pairing key which you can copy from this screen. The pairing key contains one-time authentication credentials so it is important to keep it safe.
Securely copy and record the pairing key.
Repeat above steps (from adding a new device to the Palisade console to copying and recording the pairing key) for a total of 3 times, one for each Cloud Sign device.
Cloud Sign node setup
1. Network architecture requirements
Set up your AWS environment with the following essential resources:
- AWS SDK
- Docker
- EC2 machine
We also recommend setting up an IAM Role and Amazon KMS Key to enable the database to be encrypted securely using DB_ENCRYPTION_KEY_REF - see section 5 below.
2. Authenticate your AWS account
Palisade uses AWS IAM authentication for external facing cloud access. Export the following variables to authenticate your account:
export AWS_ACCESS_KEY_ID=<your_access_key_id>
export AWS_SECRET_ACCESS_KEY=<your_secret_access_key>
export AWS_DEFAULT_REGION=eu-west-2
Please keep these variables confidential as they contain credentials that grant access to Palisade's docker repository.
3. Login to Palisade's docker repository
Once the environment variables for AWS_ACCESS_KEY_ID and AWS_SECRET_ACCESS_KEY are set, execute the following to login to the Palisade's docker repository:
aws ecr get-login-password --region eu-west-2 | docker login --username AWS --password-stdin 335650072995.dkr.ecr.eu-west-2.amazonaws.com4. Pull the CloudSign docker image
docker pull 335650072995.dkr.ecr.eu-west-2.amazonaws.com/external/custody/cloudsign/app:1.12.05. Quick Start CloudSign (testing only)
Run the following command to start a CloudSign node in the foreground:
docker run \
  -v /path/to/volume:/var/cloudsign \
  -e DB_ENCRYPTION_KEY_HEX=YOUR_ENCRYPTION_KEY \
  -e PAIRING_KEY=YOUR_PAIRING_KEY \
  -e LOG_LEVEL=debug \
  --rm \
  --name cloudsign-node \
  -it 335650072995.dkr.ecr.eu-west-2.amazonaws.com/external/custody/cloudsign/app:1.12.0
Replace /path/to/volume with your desired shard storage location.
Data is encrypted by default using the encryption key provided in DB_ENCRYPTION_KEY_HEX. This directory must be backed up and protected and the encryption key changed before first use.
Navigate to your Palisade dashboard and add a new CloudSign device, then use the generated PAIRING_KEY from the Palisade dashboard.
Note that this will run a CloudSign node in a container called cloudsign-node.
We recommend using the
DB_ENCRYPTION_KEY_REFin production with the ARN of the Amazon KMS key instead of theDB_ENCRYPTION_KEY_HEXas it provides a more secure way of handling the encryption secret. This approach ensures that all node data is encrypted using a physical HSM. Note that if you use this approach, your CloudSign node must have "encrypt" and "decrypt" permissions on Amazon KMS.
6. Run the CloudSign node
Run the CloudSign node using docker-compose script. The following example script runs 3 CloudSign nodes, on the basis that 3 CloudSign devices have been added in Palisade:
services:
  cloudsign1:
    image: 335650072995.dkr.ecr.eu-west-2.amazonaws.com/external/custody/cloudsign/app:1.12.0
    container_name: cloudsign1
    environment:
      DB_ENCRYPTION_KEY_HEX: ${ENCRYPTION_KEY_1}
      PAIRING_KEY: ${PAIRING_KEY_1}
    volumes:
      - ${VOLUME_1}:/var/cloudsign
  cloudsign2:
    image: 335650072995.dkr.ecr.eu-west-2.amazonaws.com/external/custody/cloudsign/app:1.12.0
    container_name: cloudsign2
    environment:
      DB_ENCRYPTION_KEY_HEX: ${ENCRYPTION_KEY_2}
      PAIRING_KEY: ${PAIRING_KEY_2}
    volumes:
      - ${VOLUME_2}:/var/cloudsign
  cloudsign3:
    image: 335650072995.dkr.ecr.eu-west-2.amazonaws.com/external/custody/cloudsign/app:1.12.0
    container_name: cloudsign3
    environment:
      DB_ENCRYPTION_KEY_HEX: ${ENCRYPTION_KEY_3}
      PAIRING_KEY: ${PAIRING_KEY_3}
    volumes:
      - ${VOLUME_3}:/var/cloudsign
It requires the ENCRYPTION_KEY, PAIRING_KEY and VOLUME suffixed by a number identifying the CloudSign node.
Example .env file configuration:
# cloudsign1
ENCRYPTION_KEY_1=c6516198ba86603e2fda776706b44373d5630cd2e89352772a9b75cda2df67ed
PAIRING_KEY_1=eyJkZXZpY2VJZCI6ImQz...8ifQ==
VOLUME_1=/tmp/cloudsign1

# cloudsign2
ENCRYPTION_KEY_2=0c92f60527b778f2f0036067429b3982d2c7f79ef657943f0e18c1e918362aa6
PAIRING_KEY_2=eyJkZXZpY2VJZCI6IjJm...8ifQ==
VOLUME_2=/tmp/cloudsign2

# cloudsign3
ENCRYPTION_KEY_3=bf7e463d11347c486f4b8e79284a02e0543369009ff0d1efc1d2644fe63b21a7
PAIRING_KEY_3=eyJkZXZpY2VJZCI6Ijg5...8ifQ==
VOLUME_3=/tmp/cloudsign3
Please note that directories defined in VOLUME_x environment variable need to exist before running the docker-compose script.
Approve Cloud Sign devices
Once the Cloud Sign instances are running, each device in the Palisade console will move from 'Unpaired' state to 'Waiting for approval' state. This indicates that the Cloud Sign devices have been initialized but are not yet ready to use.
An administrator needs to approve each of the Cloud Sign devices from the Palisade console in order to make them usable.
Once the Cloud Sign devices have been approved, they will move to 'Paired' state. They are now ready to use in an MPC quorum.
Create an MPC quorum
Each Cloud Sign device can be a member of many quorums. In order to initialize a quorum, navigate to the Controls → MPC Quorums section of the Palisade console and click 'Create quorum'.
- Select Quorum type to be Cloud Sign
- Give a meaningful name and a description
- Select the 3 Cloud Sign devices to be part of that quorum
- Select 2 under the Required signatures drop down
This is a one-time action. A quorum cannot be changed once created.
Click Create to create the quorum. The Cloud Sign nodes will be notified of the quorum creation request and will subsequently join the quorum. Once all devices have successfully joined the quorum, the quorum will move to 'Confirmed' state.
Create an MPC key
A MPC key requires at least one MPC quorum in 'Confirmed' state. Navigate to the Vaults → [your vault] section. Click Create key. Fill out the relevant details:
- Give the key a meaningful name and description
- Select the blockchain you want to use
- Select keystore as 'MPC'
- Select the quorum you recently created
IMPORTANT: Select the method for securely generating and storing your key. This cannot be changed once the key is created.
Each of the Cloud Sign nodes participating in the selected quorum will receive a notification for provisioning the key. Once the key provisioning is complete, the key page will reflect the key status.
A successfully provisioned key will display a public address and can be enabled for use.
Network setup options
1. Single node setup
A single node setup is suitable in cases where you are one of the shard holders among other shard holders. It assumes that you are not holding the entire quorum yourself, i.e. hosting all of the CloudSign devices.
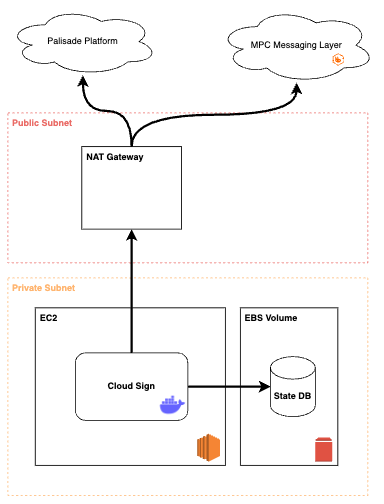
Here, we have one CloudSign instance running on an EC2 machine. The state is stored on a mounted EBS volume, on an encrypted disk. It has outbound connectivity through a NAT in a public subnet to the Palisade Platform as well as the MPC Messaging Layer. Please note that the NAT gateway here does not allow any inbound traffic.
2. Quorum setup
A quorum setup is suitable when you are holding all the shards of the quorum. The reference below lowers network risk and provides redundancy in case of loss or unavailability of some shards.
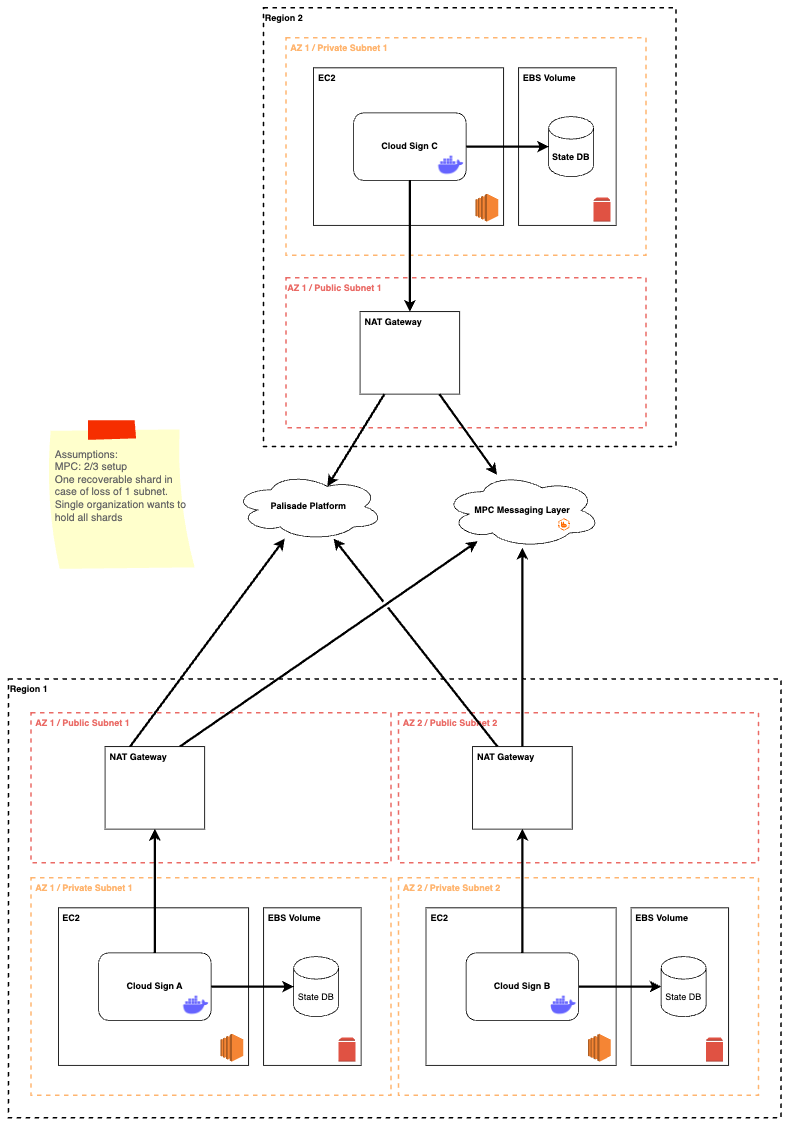
Here, we have a 2/3 quorum setup (two of the three CloudSign devices in the quorum are required to sign transactions). The setup of each individual CloudSign instance is no different than the single node setup described above.
Best practices
We strongly suggest adhering to the below best practices when setting up both single node and quorum networks:
- Use separate AWS Accounts or Organizations to further segregate access and privileges for CloudSign
- Use separate single purpose multi region replicated KMS keys for encrypting disks and EBS volumes
- EC2 must not allow any inbound access (including SSH)
- Ensure EC2 instances are using trusted AMIs
- Ensure the EBS volumes are backed up securely using snapshots
Updated about 2 months ago